Saatchi Gallery, Chelsea

On Monday 8th May I went to London to visit a few art galleries. One of the galleries I visited whilst in London was the Saatchi Gallery located in Chelsea. One of the reasons I wanted to visit the Saatchi was because the current exhibition there at the moment (‘From Selfie to Self-Expression’) that I had read about online really intrigued me and I also just wanted to check out other works they had for show there. On this visit I was able to see a lot of pieces which were interactive.

Daniel Rozin – Pom Pom Mirror (2015)

Christopher Baker – Hello World! Or: How I Stop Listening and Love the Noise (2008)

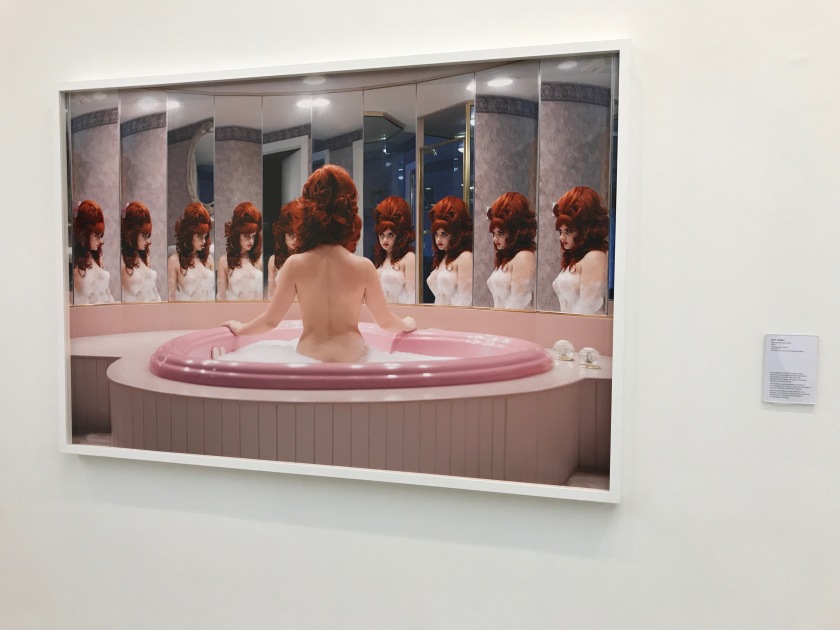
Juno Calypso – The Honeymoon Suite (2015)

1D94169C-0CF4-439B-9AFE-BC73CA0C11E5

???

Daniel Rozin – Pom Pom Mirror (2015)

28121469-6F89-4052-BB9D-D23C11DDFB3B

One of the pieces that stood out to me was an interactive piece called ‘Pom Pom Mirror’ by Daniel Rozin. This piece is an electronically powered motion sensing mirror powered by 464 motors that shows your reflection using 948 Pom Pom’ s in the colours black and white. What I really like about this is Rozin’s question behind this piece.

Who is Controlling Whom?

Are we reacting to the technology or is the technology reacting to us? I really like the message behind us as it relates to my chosen theme for Constellation: Things Can Be Otherwise – I am a Cyborg. Obviously this piece of work is reacting to us as it is portraying our silhouette but is it also controlling us? By moving our arms around the the air above us and Golding different poses (as seen in the videos above) it is controlling us by subcontiously making us do weird arm motions and movements we wouldn’t normally do.

Formative Assessment – March 2017

Week 1 – Silhouetted Still Lives

Week 2 – Light is Colour

Week 3 – Illuminated

Week 4 – Panoramic Pinhole Camera

Looking Back on the Four Weeks of Field

Week 1 Artist – Susan Anderson

Week 2 Artist – Kate Gibb

Week 3 Artist – Anne Hardy

Week 4 Artist – Nancy A Breslin

Final Field Outcome Artist – Melanie Bowles

Field Collaborative Lab Projects Review

Looking back on all four field projects I feel as if I have learnt something from each one. The field project that I found I took the most knowledge from was the Light is Colour were. During this I started off by learning more above primary colours and which colours paired together. I found that this helped me with the rest of the project as I was able to identify which colours that would work well together for the screen printing process.

Screen Printing was also another technique I learnt quite a bit about. I learnt the basics of Screen Printing in A-Level when I did Textiles but within this week I had learnt how to create my own Silk screens using the equipment they had in the printing room and also about washing off screen printing and cleaning the paint off the screens.

For my Outside/Inside project I want to interperate Screen Printing with my final pieces as I think this could leave a very interest effect on top of the overlaying writing I have been doing and also will make the pieces more vibrant as I will be using a lot of colour.

Field Collaborative Lab Week 1

Silhouetted Still Lives

Field Collaborative Lab Week 2

Light is Colour

Field Collaborative Lab Week 3

Illuminated

Field Collaborative Lab Week 4

Panormic Pinhole Camera


Field Artist – Nancy A Breslin

IMG_0101

IMG_0099

http://www.nancybreslin.com

Nancy A Breslin is a pinhole photographer I looked at during my final field project week. I decided to look at her work as she creates a variety of self portrait and landscape pieces. In my group we mainly focused on the landscape side of photography as there are quite a few woodland areas around uni.

What I really liked about Breslin’s work was the lower angle of her landscape pieces. What I like about this is that it gives the view a look at the photo in a different perspective as we alway see things from higher up its interesting so see how it looks from a lower angle. With the low angle image above, it also captures strands of the grass which I find gives a very interesting textural effect.

We tried to recreate this for our own pinhole photos and result turned out to be quite different. The main focus in our photos was the grass only as that was the only subject that was captured clearly. What I enjoy about Breslin;s work is that she was able to capture the whole of her surroundings which makes it more clear to see what she as the artist was seeing at that point.

Breslin’s self portrait photos I think are also very interesting. I really like how she has captured movement in the photo above by drinking her coffee whilst exposing the photo paper instead of staying very still. This blurred movement effect is a lot like the effect we captured when taking our own photographs which resemble the sky.


Field Collaborative Lab 4 – Panoramic Pinhole

For the fourth and final week of our collaborative field Projects with the Ceramic and Maker students, I took part in a pinhole camera project. During this project we were split into groups of three and had the task of creating our very own pinhole cameras. In my group we created three different cameras. One was made of a large Celebrations of which we used black paint to black out the inside so that no light was able to leak through and spoil the photo paper.  The second camera we made was a tin can pinhole camera which also needed black paint so that when used to expose light to photo paper, the light would not bounce of the metallic insides of the can. The last camera we made was out of a small film roll casing which did not need to be blacked out as the little capsule itself is already made to be black out.

The camera I found worked the best was the third camera which was the small film roll capsule. I think this went well as the capsule was already blacked out and had nonlight leaking through where as the others had to black out ourselves and the paint we used did not black out the can or sweet tub properly.

Above out the outcomes we got using all of the cameras that we made. As you are unable to see subject in these I think they make quite interesting abstract pieces as the shapes and different shades of black and grey leave a very interesting effect.

Also with these photos we edited them with a photo editing platform called Aurasma which I found quite hard to use. With this app (which you are able to download from the App Store onto your phone) you take a photo of the pinhole exposes after they had been developed and you are able to use a range of filters to change the intensity of the colours from the original pinhole photographto help make it easier to see what is in the photos. You are also able to create a link to an object or drawing using the camera which will automatically load up one of the pinhole photos when shown on your phone screen which I found to be very confusing.

These images above are photos of the edited pinhole photographs. I think that using this app has really helped to show what we were capturing with our handmade cameras. The top three photos were exposures of the sky and I think that this has picked up quite well after using the editing app as you can see the shapes of the clouds. The first photo on the bottom row is an exposure of a lamp post outside of uni with the sky in the background and the art building framing the bottom. I really like this photo as you are able to see the sun shining through just behind the lamp post and I think this leaves quite an interesting effect. The last two photographs on the bottom row are of the grass behind the school of art where we placed our camera on the floor in the grass a took an expose from a lower angle. After being edited you can see the different shapes the grass creates and I think this leaves a very interesting effect.

Overall I have really enjoyed this project. I was able to use the knowledge that I learnt from A-Level and Foundation when using Analog photography and also learn from the mistakes we made whilst making our own cameras and now have a better understanding of which materials work better and what I can do next time to make them better.

Field Collaborative Lab 3 – Illuminated

For the third week of our collaborative field projects with the Ceramic and Maker students, I took part in a workshop called Illuminated.

During this project we were split into groups to create a ‘Triptych’ piece and our first task was to create the centre panel of this using film to create a 20 second video.

My group came up with the idea of counting up to 10 and then counting down again to create our 20 second video. We used a projector to do this a cut of our numbers from black card. When the video started we took turns sliding the numbers onto the projector screen which was projecting onto a white wall. When we reached 10 a sheet of red asitate was held in the air above the numbers and we each took in turns a gain to slide the numbers off in order counting down from 10.

Video displayed below.

The second part of the Triptych was to then take another groups video and create the left panel of their Triptych. The video that we were given was a video that showed 4 people walking from the enterance of the school of art reception up to their studio space and back down to the reception area.

Video displayed below.

The idea that we came up with was to create our own studio space in an enclosed area which represented each person in our group. So we all found a table and an easel and then went to our studio spaces and grabbed a few items that helped to show what subject we took and what represented us as people and also represented what our studio space looked like.

From my studio space I brought my bag, a bottle of water, light bulbs from another project,  my notebook, my decayed corn I use for background textures, masking tape, a hair brush, a coffee cup, a few pens and the wall decor was from the start of this project as a warm up and we selected our own pieces to hang.

For our third Triptych we had to switch round again but this time we had a video and an installation piece to work from. The video we had was a 20 second time lapse style video with a double exposure on top of two different videos. The videos were of the sky with trees framing the side and the image was photocopies of leaves onto asitate which where stuck onto a window in a framed shape to show both the sky and the leaves from the trees.

Video displayed below.

Using these as inspiration for the final part of the Triptych, my groups final idea was to collect branches and anything that would have fallen off a tree and hang them in a small installation space. On the day we found it very hard to hang the branches even with a ladder so upgraded to hanging them against a wall which I feel worked out better as you were able to see the shadows of the branches against the white wall with the spot light we used.

Overall I am very pleased with all the final parts of each Triptych. My favourite part of this project was creating the third part of the Triptych with the branches as I think that against the white background it has quite a haunting effect especially with the shadows slightly behind in the background.